| Hangar |
Aircraft |
Category |
Date |
Preview |
| Don C | Scratch Built Grumman F9F Panther | Reference | 11-Jul-17 23:48 | 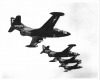 | | Views : 784 | |
| LASTWOODSMAN | SIG Cabinaire | Parked | 11-Jul-17 13:11 | 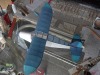 | | Views : 3283 | | Because of the high humidity, the tissue covering on the plane eventually wilted to a very wet and saggy, wavy and droopy, airfoil, and was not able then to create ANY lift !!! - BUT - I got my longest flight yet, on the second try, of 56 SECONDS !!! , on 1050 winds of the rubber, using a 15:1 winder (70 turns on the crank), and a winding stooge, before it would eventually not even hold level flights any more when the tissue became so waterlogged! I am trying to break the one minute of flight threshold barrier! By the way, as soon as I brought that wilted, waterlogged tissue airplane, back into my air-conditioned apartment, where the hot moisture in the air had been taken away, the tissue MAGICALLY shrunk back to a "drum taught", perfect airfoil !! |
| LASTWOODSMAN | SIG Cabinaire | Parked | 11-Jul-17 13:07 | 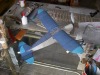 | | Views : 802 | | LONGER MOTOR & TRIM TABS - Yesterday it rained pretty good all day long, and the sun came out in late afternoon, and was evaporating all of the water into the air = HIGH HUMIDITY. I took the 22" Sig "Cabinaire" out at twilight gloaming dusk, for some flights with a new, longer motor, of two, 20" long each, strands of 3/16" rubber (prop hook to rear motor peg is 13"). The plane had on the previous evening at dusk, been flying during "transition", after initial power burst, flying into quick descending, tight, steep-turn spiral dives, on the Right Hand circle flight. I tried to counteract this, by putting a small DOWN "tab", of file folder cardboard, scotch taped (it does not rip the tissue off when you pull off the tape), taped this tab, with a little downwards bend, onto the bottom trailing edge of the outward right wing, to raise the wing during flight, and another small LEFT "tab", with a little left bend in it, taped this tab to the left side of the rudder, to counteract the right turn a bit. It flew GREAT !!! |
| mlriley540 | Scratch Built FFVS J 22 | Build | 10-Jul-17 23:25 | 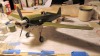 | | Views : 2024 | |
| mlriley540 | Scratch Built FFVS J 22 | Build | 10-Jul-17 23:24 | 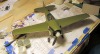 | | Views : 2051 | | Getting there. |
| David Duckett | Guillows Series 2000 - B-24 Liberator | Reference | 10-Jul-17 18:45 |  | | Views : 1098 | | Here's another photo of the festivities. Can you spot anything wrong? |
|
| Hangar |
Aircraft |
Category |
Date |
Preview |
| LASTWOODSMAN | SIG Customaire # FF-26 | Parked | 10-Jul-17 12:29 | 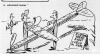 | | Views : 721 | | Note the "folding prop". |
| LASTWOODSMAN | SIG Customaire # FF-26 | Parked | 10-Jul-17 12:26 | 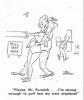 | | Views : 765 | | Cartoon Break - "Control Line Flying" - or "U- control" |
| LASTWOODSMAN | SIG Cabinaire | Parked | 10-Jul-17 06:42 | 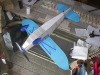 | | Views : 808 | | New tissue is covered over all the damaged area - back ready to fly!! |
| LASTWOODSMAN | SIG Cabinaire | Parked | 10-Jul-17 06:40 | 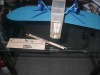 | | Views : 709 | | I then used a couple of notch sanders to make notches to hold the three 1/16" sq forward fuse bottom stringers that were busted up and removed. One of the three stringers is in place. |
| LASTWOODSMAN | SIG Cabinaire | Parked | 10-Jul-17 06:38 | 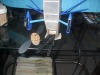 | | Views : 736 | | The pic shows the clamping plates in position, and holding tight, the glued up support plate. I was able to get the jaws of two strong clamps inside the fuse opening to hold everything together. All glued up and clamped in place. |
| LASTWOODSMAN | SIG Cabinaire | Parked | 10-Jul-17 06:36 | 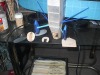 | | Views : 795 | | I was able to double white glue that chunk of balsa, that was ripped out from the bottom of the forward fuse former, right back into its spot ( it slid right back in - press fit! ). I then made a 1/16" thick, slightly smaller, 3/4 size support plate (with the rectangular cutout for the nose block), to glue in behind that forward fuse former bulkhead for additional strengthening. The pic shows the support plate (with inked lines), sitting in position inside the front fuse former. I also made two clamping plates (either side of the fuse) - one for the front of the fuse, and one for inside the fuse, to hold the support plate in place while the glue dries. |
|
