| Hangar |
Aircraft |
Category |
Date |
Preview |
| LASTWOODSMAN | Herr Engineering HRR 105, Fokker D-7 | Parked | 02-Oct-17 15:37 | 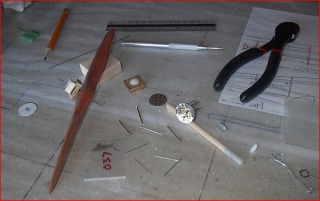 | | Views : 432 | | The six inner bolt circle holes were enlarged to the larger, brass-coated, Escutcheon pin shaft diameter (head = 3.0 mm diam , shaft = 0.050" diam), and the six outer circle holes were already enlarged just larger than the smaller, shiny steel, Dressmaker Pin shaft diameter (head = 1.5 mm diam , and shaft = 0.0235" diam). I then stuck all those pins into the new hub holes to check the fit and look. At the left, there are 4 small brass washers on the prop shaft between the new removeable prop block and the propeller. You can also see a 90 degree bend of 6mm, that I put into the front of the wire prop shaft. The old nose block with thrust button, and the old practise hub, are at the end of the wooden dowel. |
| LASTWOODSMAN | Herr Engineering HRR 105, Fokker D-7 | Parked | 02-Oct-17 15:25 |  | | Views : 320 | | I then inked on the cross hatch points on the two bolt circles with the green marker. On these "Xs", I pushed in starter holes, by eye, with an awl. I enlarged all of these holes by chasing through with a 0.0250" drill bit. The "old" design practise hub is on the left between the dime and the nickel. |
|
| Hangar |
Aircraft |
Category |
Date |
Preview |
| LASTWOODSMAN | Herr Engineering HRR 105, Fokker D-7 | Parked | 02-Oct-17 15:20 | 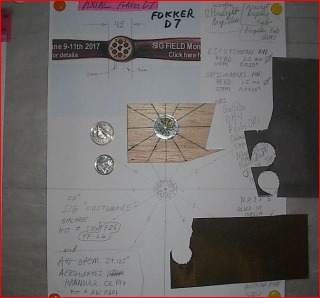 | | Views : 303 | | This is for my new laminated 9 1/4" scale "AXIAL" prop I made a while back. I made a separate new removeable prop block, prop shaft, thrust button, and new prop hub assembly for this new prop, so I can interchange the 9 1/2" gray plastic prop and prop block, with the new AXIAL prop and block. I started out with an oversize piece of 1/16' blasa plate sheet for a hub plate, and stuck on a "nickel sized" circle of Chrome 'peel n stick' Trim Sheet on to it (centered with an upside down dress maker's pin), then I stuck a "dime sized" circle of Gold 'peel n stick' Trim Sheet onto the larger Chrome circle, also centering it on the same dress maker's pin. Then I used a green Sharpie permanent marker to mark the 12 location lines on which to locate 2 bolt circles for 6 bolt heads on each circle. |
| LASTWOODSMAN | Herr Engineering HRR 105, Fokker D-7 | Parked | 12-Jun-17 10:47 |  | | Views : 338 | | I am letting them thoroughly dry out for a week. A wise man once said, "Lighting is everything." - and so is focus. It is all NOT VERY EASY !! I took a lot of pics to arrive at this underside image, lit from ambient sunlight against vertical blinds. |
|
