| Build Thread, Page :
1 2 3 4 5 [ 6 ] 7 8 9 10 11 (200 posts, 20 posts per page, 11 pages in total)
|
[ < Prev ] [ Next > ] |
| RodN, Comment for image # 9046 | 09 Aug 08 03:59 |
| Museum quality at it's best. Well done indeed! |
| wingspanner, Comment for image # 9046 | 09 Aug 08 02:16 |
| Stunning!!! |
| RodN, Comment for image # 9053 | 08 Aug 08 21:06 |
| This is truly inspirational Creo. I canot wait to see the finished article. Great work!!! |
| Creosotewind, Comment for image # 9046 | 08 Aug 08 17:22 |
| Very high praise. Much thanks Poppy. |
| poppy, Comment for image # 9051 | 08 Aug 08 16:33 |
| WOW! |
| poppy, Comment for image # 9046 | 08 Aug 08 16:32 |
| One of the most realistic engines I've seen!! Super work!! |
| SteveM, Comment for image # 9053 | 08 Aug 08 11:34 |
| Haha, how true, but watching you build this plane has been no less inspirational. |
| Creosotewind, Comment for image # 9053 | 08 Aug 08 10:45 |
| Since I started this kit, over a year ago, I estimate David D has built 6,748 planes. That makes him the "Arsenal of Democracy" for Virtual Aerodrome. Good work, David. |
| Creosotewind, Comment for image # 9053 | 08 Aug 08 10:44 |
| The white stripes (aren't they a band?) and numbers still need touching up. The yellow is actually more of a lemon yellow. In the photos, the yellow looks more like a chrome yellow, which is more accurate. |
| Creosotewind, Comment for image # 9046 | 08 Aug 08 10:41 |
| The spark plugs are brass tube, the plug wires are solder. The rubber hose is brass wire painted black, except for the fitting to the engine block, which was left bare metal. The hose clamps are thin pieces of aluminum. |
| Creosotewind, Comment for image # 9047 | 08 Aug 08 10:40 |
| The radios were drawn on my computer. The big dials are screws for eye glasses. The smaller dials are just buildup of white glue painted black. Clear nail polish for the radio window. Once they were trimmed to size, the papers were glued to Lego roof tiles that were also trimmed to size. |
| Creosotewind, Comment for image # 9048 | 08 Aug 08 10:37 |
| Lots of touch-up needed. Oh well, this plane was meant to be a learning exercise. |
| Creosotewind, Comment for image # 9049 | 08 Aug 08 10:36 |
| The underside insignia came out almost perfect. The masks worked as they should. The top one had some bleed, which I was able to scrape mostly away. I sprayed white first, overlayed the star and bars mask and sprayed white again, to seal the mask. Then I sprayed the blue. I think the masks set to long and tended to curl, opening up the edges. I should have overlaid colors a bit sooner to prevent that. Also, the lower wing worked better because the colors were not so heavy with the coats. I still need to develop a good airbrush technique. It's been too many years that I've used it with any regularity. |
| Creosotewind, Comment for image # 9050 | 08 Aug 08 10:32 |
| I still need to clean up the buzz numbers. |
| Creosotewind, Comment for image # 9053 | 08 Aug 08 10:32 |
| The name of this plane is "Rosie the Rocketer", which was flown by Major John Carpentier in France. He had six bazookas attached to the wing struts, three per side. He is credited with six German vehicles destroyed. Some of them were tanks. I'm just getting started on making the bazookas. |
| Creosotewind, Image # 9053 | 08 Aug 08 10:29 |
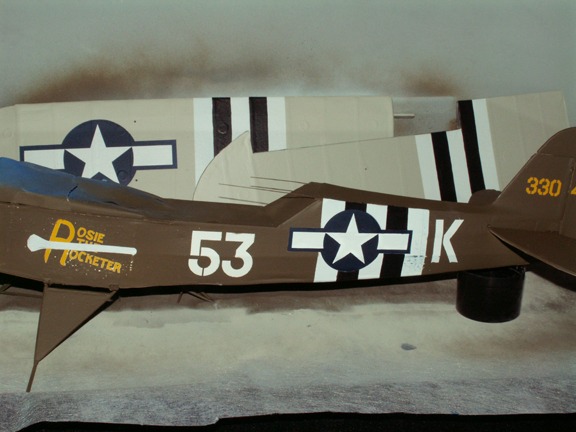
Almost ready for D-Day. |
| Creosotewind, Image # 9052 | 08 Aug 08 10:28 |

Getting closer to finish. |
| Creosotewind, Image # 9051 | 08 Aug 08 10:28 |

Receiver & transmitters in place. |
| Creosotewind, Image # 9050 | 08 Aug 08 10:26 |

Cleanup of the insignia. Invasion stripes will be hand painted. |
| Creosotewind, Image # 9049 | 08 Aug 08 10:25 |

More painted markings. |
| Build Thread, Page :
1 2 3 4 5 [ 6 ] 7 8 9 10 11 (200 posts, 20 posts per page, 11 pages in total)
|
[ < Prev ] [ Next > ] |
