| Build Thread, Page :
<< 16 17 18 19 20 [ 21 ] 22 23 24 25 26 >> (851 posts, 20 posts per page, 43 pages in total)
|
[ < Prev ] [ Next > ] |
| Skyediamonds1985, Comment for image # 35990 | 03 May 16 22:34 |
| Biplane: thank you. I was a bit worried that I might've overwhelmed you. From what I can see in your postings of the N2S ( PT-17), you're very detail-oriented and very good at it. The bottom line is preparation of the surface prior to the paint. You don't have to add the clear coat prior to the colored paint. Just be aware of the "silvering" of the decals from the microscopic air bubbles trapped between the surface and the decals. This "silvering" shows up as an opaque film seen around the edges of aircraft logos, insignia, and between numbers and letters. One way to eliminate or minimize this silvering is to coat with clear after the colored paint and prior to the application of the decals, or simply carefully cut around the decals right down to the edges. This might even include cutting out individual numbers and letters. Time-consuming and its a hassle, but the results are worth it. I owe much of this information to: Mr. DD, Poppy, John O, and other members of this forum. Please write direct: Skyediamonds1985@yahoo.com We've got a lot to share and a lot in common. |
| Skyediamonds1985, Comment for image # 35981 | 03 May 16 22:16 |
| Biplane, I'm glad I was able to offer some "insight" into this wonderful world of modeling. I was really concerned that I might've provided too much. From what I could see in your posts of the -17, you're a lot like myself. I can easily see your goal of replicating the N2S to near-exacting standards. Having said that, when it comes to the finish (decals included), its all in the preparation. The more care and preparation to the model, the better the finish. I'm guessing that you'll wish to have the model turn out literally furniture-polish finished in its glossy paint scheme. Careful attention to the primer and light sanding and cleaning of the surface, combined with glossy paint, will result in an outstanding finish. I quoted "insight" at the beginning of this post, because I'm still learning myself. I must give due credit to first, DD, Poppy, Meku, John O and Don C, as well as many other members of this forum. without them sharing their experiences, I wouldn't have been where I am today. You may write to me direct at: Skyediamonds1985@yahoo.com We got lots to share and lots in common. Hope to hear from you soon. |
| biplane guy, Comment for image # 35990 | 03 May 16 15:54 |
| Wow, your SE5a is coming along nicely. The wing coverings look really sharp. I love the texture. You are a fount of information my friend. Thanks for sharing. |
| biplane guy, Comment for image # 35981 | 03 May 16 15:46 |
| Thanks for all that info, Skye. That helps a lot. |
| Skyediamonds1985, Comment for image # 35981 | 02 May 16 23:19 |
| Just so you'll know, I skipped all that clear coat and primer stuff, because I was using the heat-shrink Solartex and wanted to preserve the fabric weave pattern that might be lost with all the clear coats. I applied the setting solution mixed with a bit of water, added the decal, worked out the winkles and bubbles using a dampen paper towel. Allowed to semi dry, then added the setting solution itself on top of the decal. Waited a bit, then used a dampened paper towel to dry and wipe off any remaining solution from the surrounding decal. |
| Skyediamonds1985, Comment for image # 35990 | 02 May 16 22:58 |
| Use the ink jet printer on the blank decal sheet as you would for the Graf-X.... If you can't find any blank decal sheets or your local arts and crafts store doesn't have them, this is a really neat trick. Use ordinary mailing labels that you have to lick with your tongue to stick on to the box/package. Paint the back of the mailing label (the glue side) with your choice of paint. Simply make outlines of your letters and numbers with a pen. Carefully cut out the letters/numbers (again) inside the outline as the ink from the pen will dissolve and run down). Then dip the cut outs into water. The glue backing dissolves in water and thereby allows the paint to slide off, becoming its own decal... :0) |
| Skyediamonds1985, Comment for image # 35990 | 02 May 16 22:37 |
| Sorry, got cut off by mistake. Before spraying the clear, try spraying a coat of primer on the finished surface of your model (not the decal). Make absolutely sure that you have applied sufficient coats of dope to fill in the weave of the silkspan and be sure to lightly sand between coats to help get rid of the "nap" which is a technical term for the loose fibers from the tissue sanded off. Generously brush off using a dry brush followed by use of a lightly damped paper towel, then tack cloth. Make sure the surface is absolutely free of any loose fibers or dust.... and totally dry. Then add the primer. After lightly the sanding of primer and making sure all blemishes are removed (again generously dry brushing followed by use of a lightly dampened paper towel, repeat this stage until all the loose primer/dust is removed, then use of tack cloth), when its all totally dry, then shoot a coat of the choice of colored paint. Apply the decals as you wish. What is missing from the article, is the additional application of the final coat of clear over both the dried decals and colored paints (the whole enchilada). At this stage, you don't have to wait until the whole model is completed. You can shoot the protective clear over finished sub-assemblies such as the tail, fuselage, and separate wings and their control surfaces. You have a choice of gloss or flat. My guess is you'll be using the gloss (again) to help replicate the glossy finish of the real biplane. This protects both the decals and paints from fuel and handling. Hope this helps. Let me know if you need more info. |
| Skyediamonds1985, Image # 35990 | 02 May 16 22:31 |
Biplane guy: I suggest instead of using the Graf-x stick-type, try purchasing a small package of blank decal sheets. Most are available through Hobby Lobby or other fine arts and craft stores. They come either white or transparent backgrounds depending on your needs. My guess is to use the white background sheet as ink-jet printers do not print out white ink. The white background will make up for this by simply you making an outline of the letters/numbers then carefully cutting them out "INSIDE" the outline so as to eliminate the outline altogether. Special note: try adding a coat of clear paint (I use Krylon" |
| Skyediamonds1985, Image # 35989 | 02 May 16 22:18 |
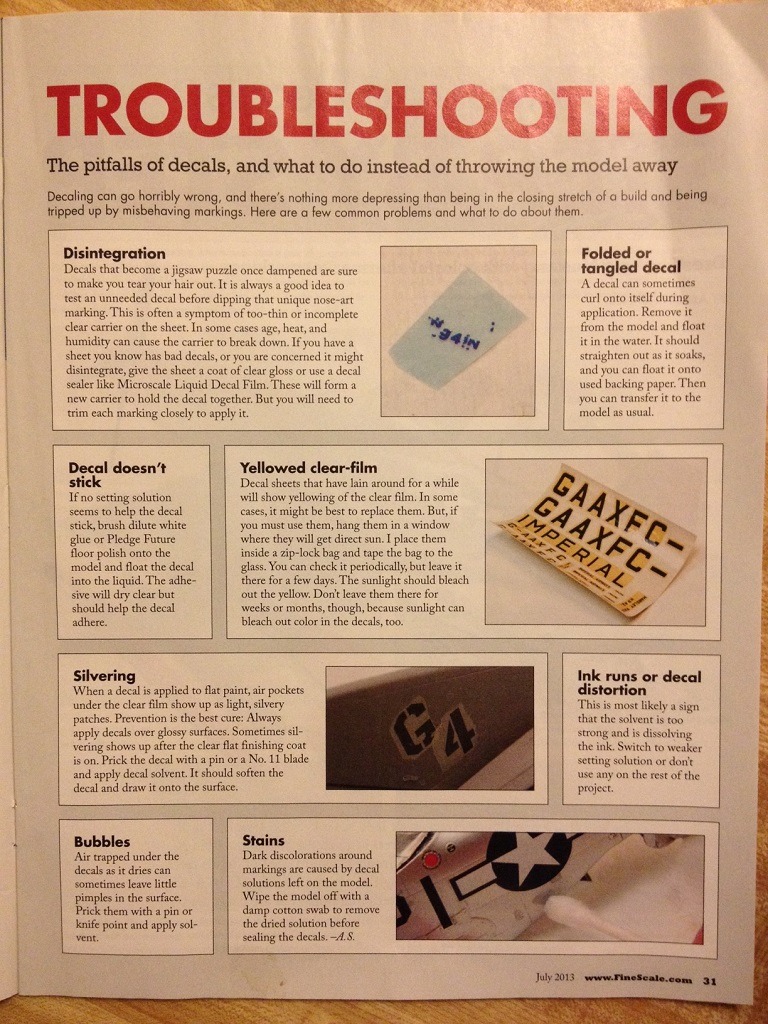
The second part describes the setting solutions and their name brands. I personally use Micro Set. The Micro Sol, as the article states, is more of a solvent and really works hard on the decal in softening it up. I would try to avoid it, unless you wish to experiment on a sample. Be aware, that the setting solutions literally "grabs" the decals as you lay it down. Thus, I apply a bit of water using a small brush around the desired area. Then dip the brush into the Micro Set and mix it in by rubbing the brush all around the same desired area. Afterward, I apply the Micro Set on top of the decal. Allow it to dry thoroughly. II'm going to post additional info on my next pos |
| Skyediamonds1985, Image # 35988 | 02 May 16 22:12 |
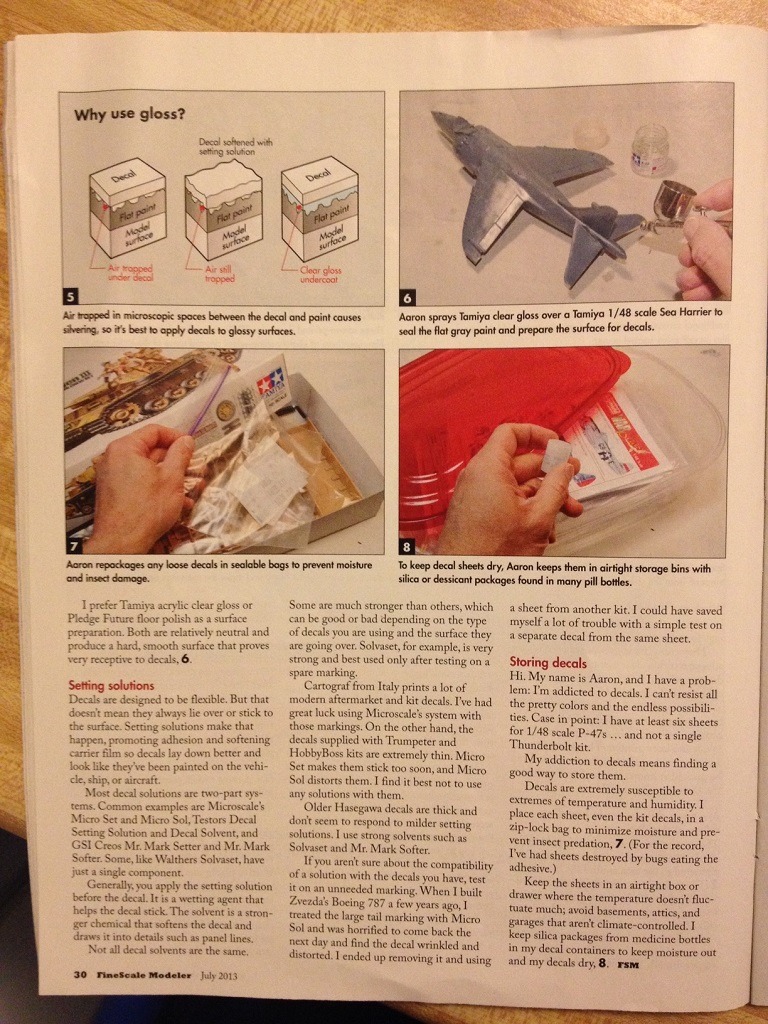
Part two of three |
| Skyediamonds1985, Image # 35987 | 02 May 16 22:11 |
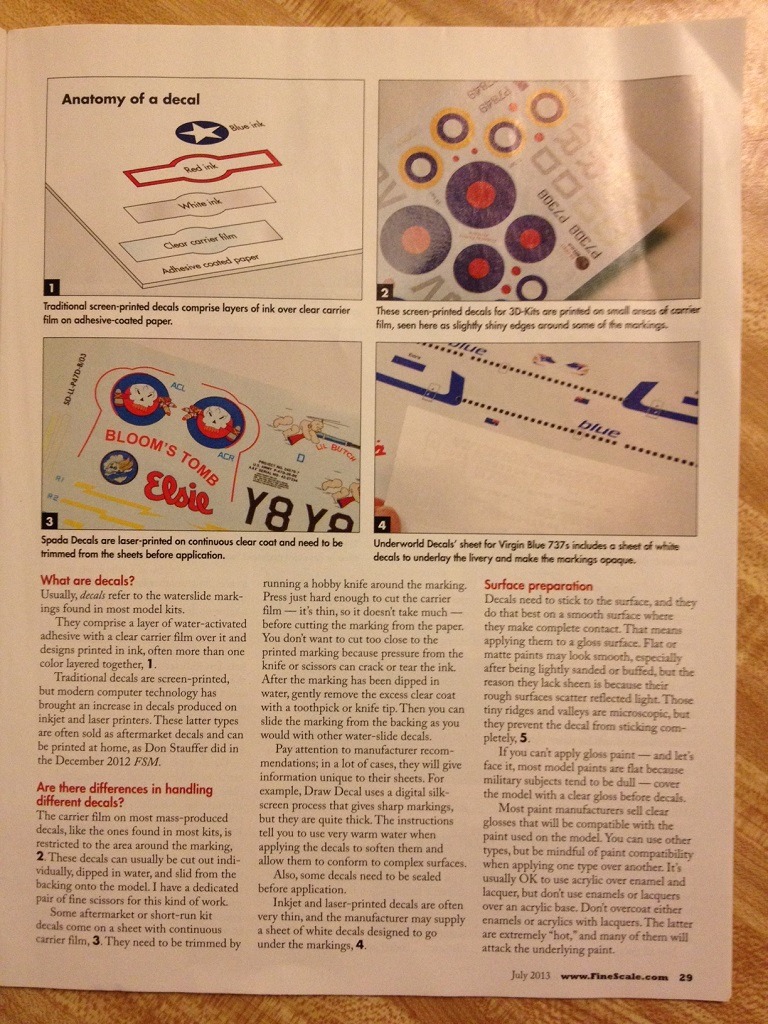
Part one of three on decals. Please let me know if you can read this. |
| Skyediamonds1985, Comment for image # 35981 | 02 May 16 22:09 |
| This is for Biplane guy: courtesy of FineScale Modeler. The article was written by Aaron Skinner back in July 2013. I'll add a post script after the "Trouble Shooting section." |
| biplane guy, Comment for image # 35981 | 02 May 16 16:15 |
| That looks great, Skye. What kind of setting solution did you use? Do you apply it over the decal as well? Do you know if it's dope proof? I'm about ready to paint the red stripes on the fuselage and wings of my N2S. Then I will be ready for the decals. I'm thinking of putting some sort of clear finish over the finished product but I'm not sure what to use. Any suggestions? Everything so far is painted with Sig Supercoat Butyrate Dope. |
| biplane guy, Comment for image # 35978 | 02 May 16 14:25 |
| Don't you wish you got paid by the stitch? |
| Don C, Comment for image # 35978 | 02 May 16 10:43 |
| Have fun! |
| John M Oshust, Comment for image # 35981 | 01 May 16 21:41 |
| These do sink like paint. |
| Skyediamonds1985, Comment for image # 35979 | 01 May 16 21:04 |
| John, your eyes are great and I thank you for your discretion. But truth be told, decided to forego the stitching. Just couldn't bring myself to add 1,248 stitches. The tape is to scale at apprx 1/8" in width, this means each of those stitches would be only 1/16" across. This translates to about two weeks working on a near-microscopic level to ensure each one carefully spaced, that they're in the center of the tape to allow for 1/16" in overlap on each side of the stitch, and each perpendicular to the length of the surface tape, matching each row after row.....Oy Vey!! |
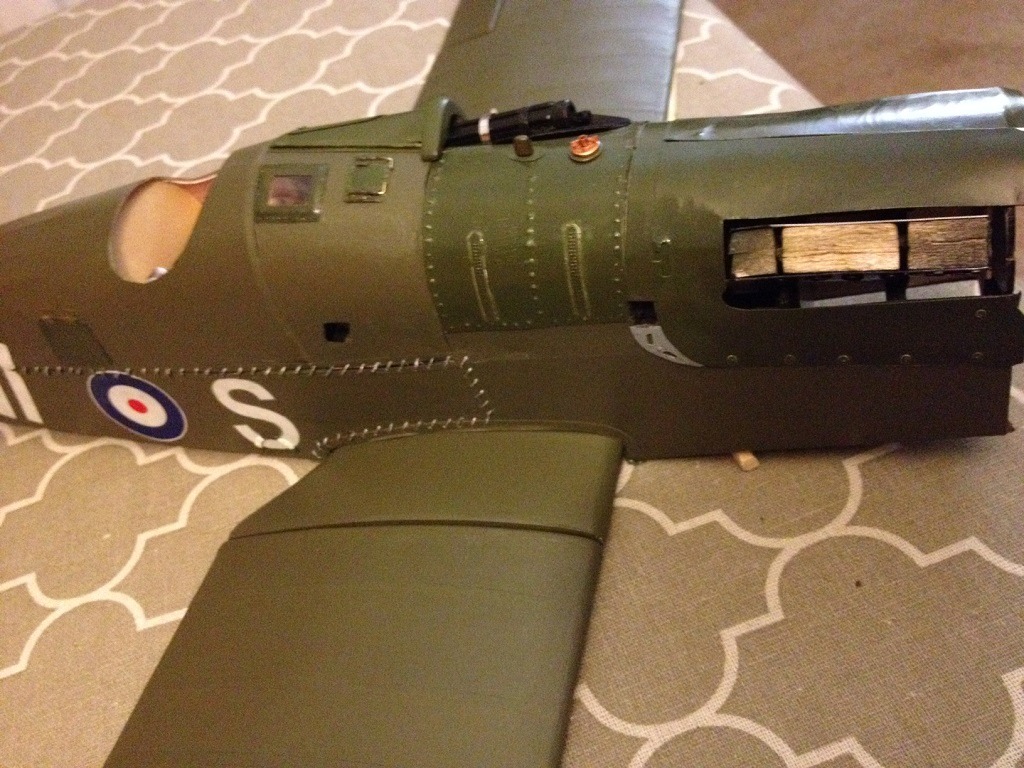
| Skyediamonds1985, Image # 35981 | 01 May 16 20:41 |
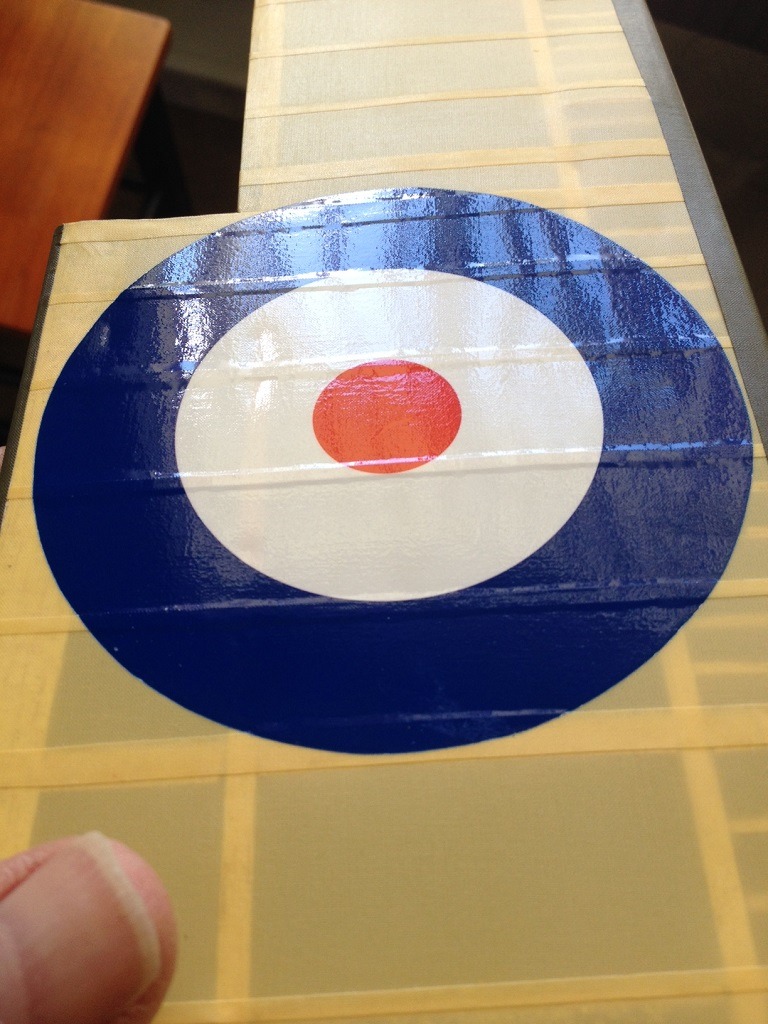
Used Brantley's custom decals. They're thinner than the Guillows and with the use of setting solution, really hugs the surfaces like paint. |
| John M Oshust, Comment for image # 35980 | 01 May 16 20:39 |
| Why one not seeing stitching. How remiss of me! |
| Skyediamonds1985, Comment for image # 35979 | 01 May 16 20:39 |
| As you can see, Solartex has a nice weave pattern that emulates fabric pretty good. |
| Build Thread, Page :
<< 16 17 18 19 20 [ 21 ] 22 23 24 25 26 >> (851 posts, 20 posts per page, 43 pages in total)
|
[ < Prev ] [ Next > ] |
